Project Management

Useful Redmine Plugins

Published by:

At Cybrilla, we use Redmine project management tool for almost all of our projects. Redmine is  an open source project management tool which provides great out of the box features such as issue tracking, time tracking, role based access control, multiple projects support etc.

We have found redmine to be a solid product which fullfills most of our project management needs. Once of the great features is that redmine supports a lot of plugins which will aide you incase you opt for redmine.

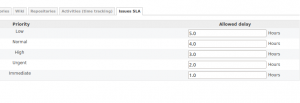
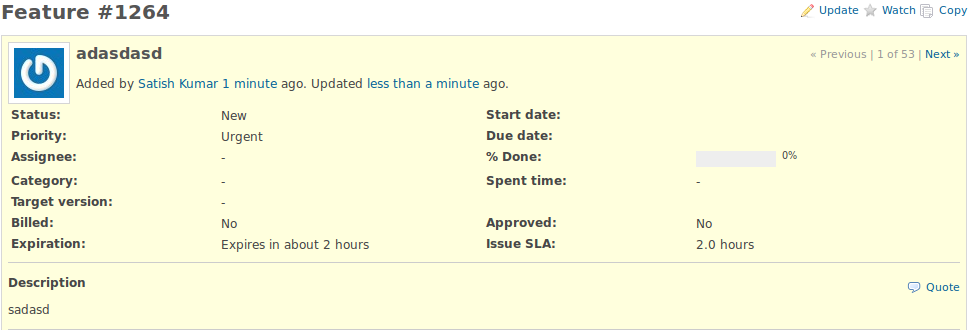
1. redmine issue sla plugin : this plugin allows to assign SLA by issue priority to a project . All you need to do is set a SLA for each of your issue priorities ( number of hrs ) and it`ll automatically tell the response time when the issue should expire as per the set SLA

set_sla sla


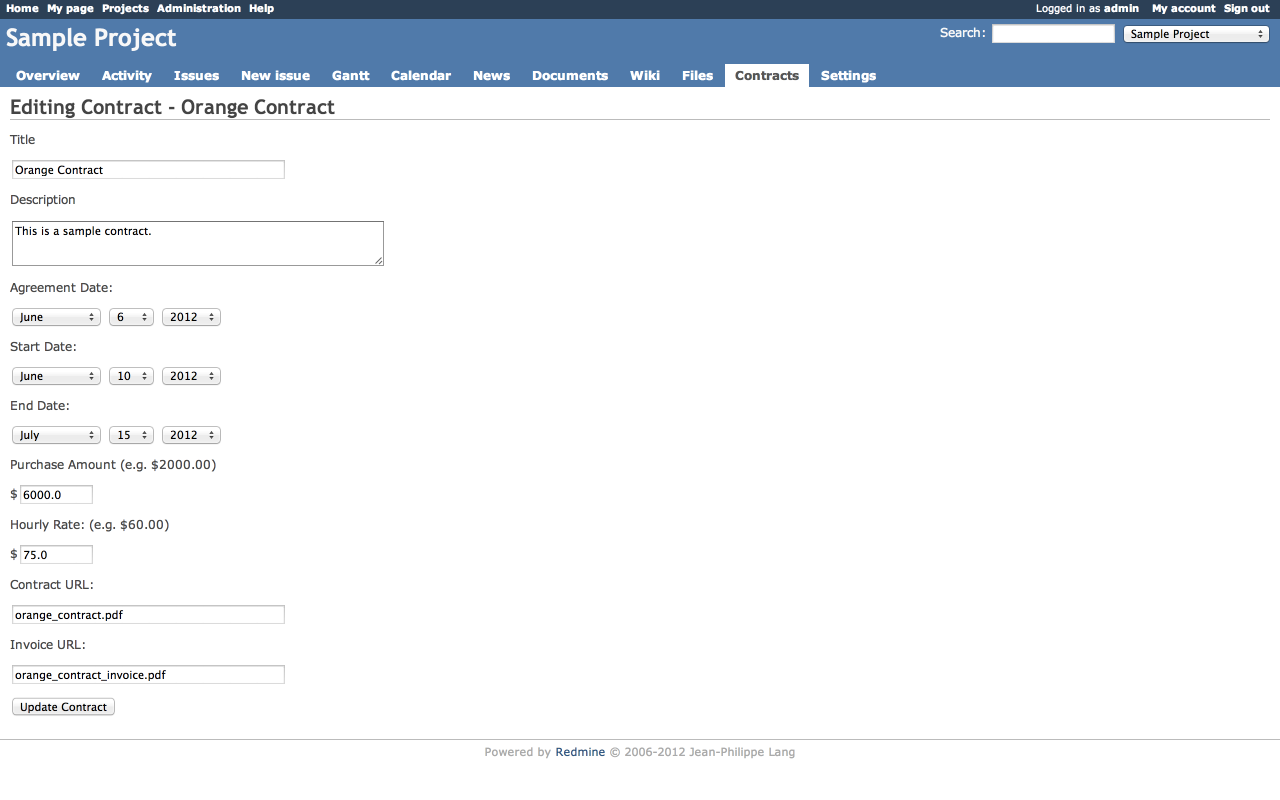
2. redmine contracts with time tracking : Another great plugin, it helps manage time and money being spent on a particular contract. This solves on of the major issues involved in project management that of managing project cost. This plugin tells you exactly where the money is being burned, under which issue/ category etc.

One needs to create a new contract using the plugin and enter the start and end dates and the hourly rate. The plugin takes care of the rest and all you need to do is monitor the costs.

edit_contract multiple_contracts single_contract


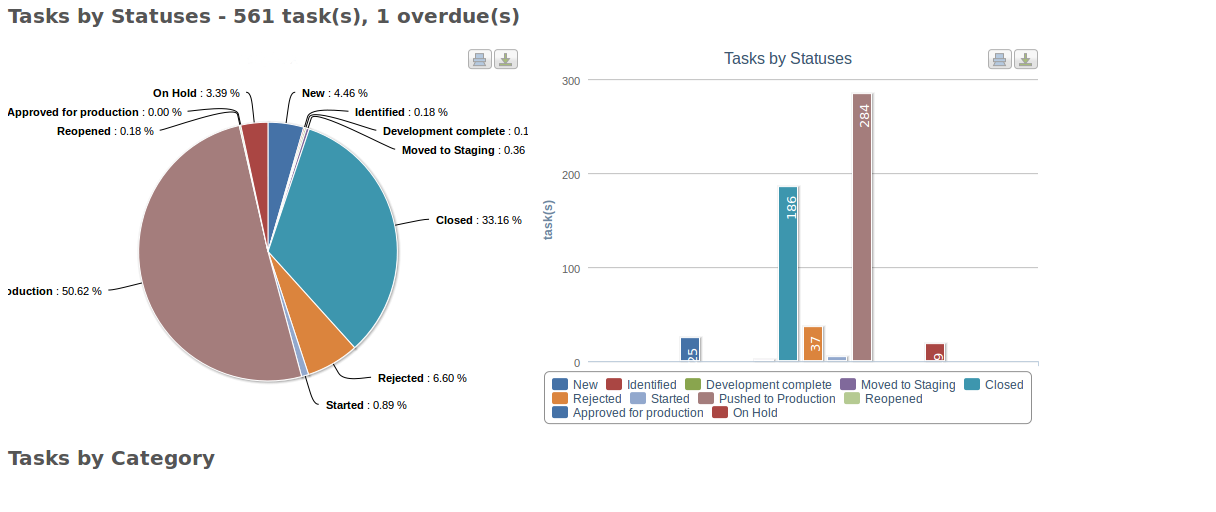
3. redmine monitoring and controlling : this is a chart tool to monitor your project in redmine. It provides very informative charts and graphs for task management, time management and resource management. One downside is that it does not provide filters for  generating the charts. ( am in the process of adding one 😉 )

monitoring_1

Some useful links :

Redmine githhub repo

Redmine guide

Redmine plugins

RailsTips

Creating Your First Gem is Easy…

Published by:

Many of us used of so many gems in ruby, so lets try to create a basic gem.
Simple, We just have to generate two files to create your own gem.

Step1: Create a gemspec.
Create a gemspec file inside root directory, file-name should be same as your gem name (Eg: In our case its greeting_gem.gemspec)

– Specify your gem specifications

Step2: Add some code.
Create a greeting_gem.rb file in lib folder

Step 3: Generate gem file.

This command will build the gem, which can be used in another ruby program.

Step 4: Test the gem.
gem install greeting_gem, to install the gem locally to test it out.
open irb
>> require ‘greeting_gem’
=> true
>> GreetingGem.greeting(‘sravani’)
Hello sravani

Isn’t it simple!
Add as many methods you want in the same way and move on to bigger things.

ProgrammingTips RailsTips

RailsTip: Setting boolean values in ActiveRecord callbacks

Published by:

I realized the importance of reading documentation clearly and with care, when I spent hours debugging this stupid problem.

This is an Active Record callback in action. We are setting a boolean field ‘approved’ to false in the before_create ActiveRecord callback.

This code is simple, straightforward and looks flawless, until you see a ActiveRecord::RecordNotSaved exception when you try to create a Topic. Our only savior, the errors object also doesn’t give us any information on what went wrong.

Two important things we always forget and aren’t quite obvious are

1. Implicit return values in Ruby. This feature always returns the value of the last executed statement in a method or block.

2. If an ActiveRecord callback returns false, all the later callbacks and the associated action are cancelled.

In our example, the statement ‘self.approved = false’ returns false and since that is the last statement executed in the callback, the callback returns false which cancels the create operation.

So, the best way to set boolean values in an ActiveRecord callback is

News

The new beginning

Published by:

After a long wait (6 months i believe), things started falling in place starting with an awesome new office. We are really excited about this place as much as we are excited about our work.

The two things which we like about the place are

Sunlight

This place allows ample amount of sunlight to come in. That keeps the office area well lit always, which I believe improves the work efficiency (I’ll post numbers as we gather some)

Cybrilla office with ample sunlight

Roof Terrace

The roof terrace is an open air terrace which we use for our daily lunches, weekend parties, rejuvenating ourselves between work and of course for stand-up meetings some time. This multipurpose area is where we spend most of our time in the office.

Cybrilla office roof terrace

Here’s what our team has to say

Photogenic, day in day out, and beautiful in the evening, its my window.

I feel like being in the office all the time.

This office symbolizes the silicon valley startup offices which I always dreamed of.

Best workplace I have ever worked at.

With this new workplace, we are hoping to improve our team efficiency and in turn the service to our customers.

Uncategorized

Statemachine

Published by:

What is Statemachine?

Statemachine is any device that stores the status of something at a given time and can operate on input to change the status and/or cause an action or output to take place for any given change. A computer is basically a state machine and each machine instruction is input that changes one or more states and may cause other actions to take place.

example1: Turnstile

Statemachine diagram for turnstile

Turnstile has two states:
1) states: locked and unlocked
2) There are two inputs that affect its state: putting a coin in the slot (coin) and pushing the arm (push).
3) In the locked state, pushing on the arm has no effect; no matter how many times the input push is given it stays in the locked state. Putting a coin in, that is giving the machine a coin input, shifts the state from Locked to Unlocked.
4) In the unlocked state, putting additional coins in has no effect; that is, giving additional coin inputs does not change the state. However, a customer pushing through the arms, giving a push input, shifts the state back to Locked.

Statemachine has 3 fundamental components:
1) States
2) Events
3) Transactions

From above example: we have
States: locked and unlocked
Events : putting the coin and push the arm
Transactions: locked to unlocked, unlocked to locked

example2: Vending Machine
Uml diagram: States and Transitions:
The Statemachine that runs a simple vending machine.

From the above UML diagram: we have
States: Waiting, Paid
Events : dollar, selection
Transactions: waiting to paid, paid to waiting

What is event?
Event is an action or trigger, which invoke the transition to change the state of the object.

What is Transition?
Each transition can be defined by identifying the state where it begins, the event by which is invoked, and the state where it ends.

Ruby Toolbox Statemachine

Ruby Toolbox Statemachine has list of gems which supports statemachine functionality.

Why we need statemachine functionality in ruby?
The main reason for using state machines is to help the design process. It is much easier to figure out all the possible edge conditions by drawing out the state machine on paper. This will make sure that your application will have less bugs and less undefined behavior. Also, it clearly defines which parts of the internal state of your object are exposed as external API.

Most web apps contain several examples of statemachine, like accounts, blog posts, orders, invoices and many more.The problem is we never think of them as statemachines while designing your application. Therefore, it is good to have some indicators to recognize them early.

Since Ruby has list of gems.Among them, below 3 gems are fully-featured,
statemachine
aasm
workflow

The above three gems vary in their syntax and some additional features.
You can find the detailed explanation of:
statemachine
@:https://github.com/pluginaweek/state_machine
aasm
@:https://github.com/aasm/aasm
workflow
@: http://rubydoc.info/gems/workflow/frames

Table: List of features in gems.

STATEMACHINE AASM WORKFLOW
Callbacks yes yes yes
Guards(Conditional transition) yes yes yes
Automatic Scope no yes yes
Validation errors yes no no
Dirty attributes yes no no
Tracking & Observers yes no no
Transaction Support yes yes yes
Named Scope yes no no
Transition Context yes no no
Generating Graphs yes no no
Transaction Event Handler no no yes
Inheritance yes no yes
Transition hooks yes no yes
Integration with ActiveRecord yes yes yes
Integration with couchDB no no yes
Integration with Mongoid yes no no
Integration with ActiveModel,
datamapper,mongomapper & sequel
yes no no
Static/dynamic definitions yes no no
Core Extensions yes no no
Development

Jqplot – An open source jquery plugin to create charts and graphs

Published by:

As we all know how jQuery make things easy for us to develop and perform better. So here we will talk about the jqplot, which is a jQuery plugin based upon pure javascript, used to build up beautiful line, bar and pie charts with enormous features in it like customized axis, multiple x and y axis, tooltips and labels which you can adjust and customize according to your needs or requirements. In addition to this, it is an open source project which means you can just download it and use it for free whether for commercial or private use.

So here is a short description which will give you a brief idea on how to use it.

  1. Download jqPlot from it official download page. http://bitbucket.org/cleonello/jqplot/downloads/
  2. Unzip downloaded jqPlot copy.
    1. Copy and paste jquery.jqplot.min.css from “dist/jquery.jqplot.min.css” in “css/ ” folder of your web app.
    2. Copy and paste excanvas.min.js from “dist/excanvas.min.js” in “js ” folder of your web app.
    3. Copy and paste jquery.min.js from “dist/jquery.min.js” in “js/ ” folder of your web app.
    4. Copy and paste jquery.jqplot.min.js from “dist/jquery.jqplot.min.js ” in “js/ ” folder of your web app.
  3. In your markup, just use it like this:
  4. Now just open up your markup file in your browser and you would be able to see the plot.

Here is the screenshot of one that i just created:

Development

Native vs Hybrid vs Web application ? Which one to choose?

Published by:

With the inception of HTML5 and CSS3 and with the likes of PhoneGap, Appcelerator, RhoMobile, IBM Worklight coming up with cross platform mobile app frameworks the biggest question running in the minds of mobile app developers is regarding which mobile architecture to use .

Well after running around the internet and searching for answers myself I have tried to narrow down and summarize the problem with the help of the following questions :

What is Native? Hybrid ? Web apps ?

Native refers to building an app in a device’s native programming language. For iOS devices this means Objective-C, and for Android it’s Java. Native apps are typically fast, reliable, and can access all the the device’s hardware. These apps are usually built for high performance needs like mobile games. But the downside is that once built this app is tied down to the platform for which it is built. So an iOS app would not run on an Android device.

A hybrid app is built using web technologies, and then wrapped in a platform-specific shell that allows the it to be installed just like a native app. Thus it is sold/accessed through the device’s app store. PhoneGap is an example of a framework that allows you take a web app and turn it into a native app for iOS, Android, BlackBerry, Windows 7, WebOS, Symbian and more. The hybrid frameworks typically have APIs as well, that allow you to access the device’s hardware and features that are locked out from the browser.

A web app is a website that you access from your device’s browser, but the site is made to resemble an application rather than a traditional website. It’s purpose is also more functional – it offers a utility or service rather than a straight-up website which is often more informational. A web app can be accessed by any mobile device that has a browser. Though being browser-based, it’s typical that not all of the device’s hardware features can be tapped into. To produce a more engaging and interactive experience. HTML5, CSS3 and JavaScript are increasing being used to take advantage of the advanced features offered by this new specification.

1> Pre application build considerations. What kind of application is to be built ?

What architecture you use depends mostly upon the kind of application you want to built.

If you application require the use of native features like camera, bluetooth, accelerometer, database, microphone, speaker, GPS, PUSH etc, then you are better off with a native app. Native apps provide you seamless transitions and quick/flawless access to these device capabilities. Or maybe you want to develop a high end game which utilizes the device graphics and relies on offline storage capabilities, native is the way to go.

On the other hand suppose that your app will seldom utilize minimum device capabilities like camera, push notifications, then you can go for an hybrid app. These apps will infrequently use these capabilities but are not entirely dependent on them. Depending upon the API`s provided by different frameworks like PhoneGap, Rhomobile, Worklight etc you may choose one and start building the app. As the code written using these frameworks is interpreted by the browser and then compiled these apps are slower than the native apps.

The last case is if you want to create a web app wherein you just want to share some information with the users on a regular basis or provide some kindof notifications to the users or for eg. You want to provide a product catalog for the consumers online. In this case the application does not utilize any of the device capabilities like camera, bluetooth etc. Such applications can be built using the powerful yet simple emerging technologies like HTML5 and CSS3. These apps can be accessed from anywhere by anyone using any device as long as they have an internet connection. These apps are the simplest to develop and maintain.

2>Post Application Built Considerations. Cost for developing, testing, maintaining, versioning.

Going native is always going to be costly. Consider this, you may want to develop a game which is available for iOS, android, blackberry and windwos 8 platforms.

Not only do you need experts across different platforms to develop this game, but you now have to maintain 4 copies of the same game.


Going native would increase the cost for distribution, testing, maintenance, enhancements etc.. On the plus side however, these apps will provide you with all the functionality the device has to offer. The user experience would be the best and cannot be compared elsewhere.

The plus point with developing a hybrid application is that the cost of building the application is reduced drastically. You would only need to develop the code once and the framework will provide you with 4 working versions for as many different platforms.

Thus testing and maintenance of the app also reduces. But these apps are yet to showcase the seamlessness and user friendliness displayed by the native applications. One can only imagine with technologies like HTML5 and CSS3 developing that the gap between hybrid and native will be reduced.

The web applications are again the most simplest to develop. Once however needs to take care adjusting the web page resolution depending upon the screen size of the device. For example the same screen resolution used on a 4 inch iPhone will not look great when used on a 8-9 inch tablet. By careful design considerations and coding this however is not a huge task. Again these apps are the simplest and do not use any device capabilities.

Below are a few points which compare the advantages and disadvantages of each :

Native Hybrid Webapp
Skills/tools needed for cross-platform apps
  • Objective-C
  • Java
  • C
  • C++
  • C#
  • VB.net
  • HTML
  • CSS
  • Javascript
  • Mobile development framework (like PhoneGap)
  • HTML
  • CSS
  • Javascript
Development Speed
Slow Moderate Fast
Number of applications needed to reach major smartphone platforms 4 1 1
Advantages Lets you create apps with rich user interfaces and/or heavy graphics. Combines the development speed of mobile web apps with the device access and app store distribution of native apps. Offers fast development, simple maintenance, and full application portability.  One mobile web app works on any platform.
Disadvantages
  • Development Time
  • Development Cost
  • Ongoing Maintenance
  • No portability (apps cannot be used on other platforms)
  • Can’t handle heavy graphics.
  • Requires familiarity with a mobile framework
  • Can’t handle heavy graphics.
  • Can’t access camera or microphone.
Development

How are gems loaded in a Rails application

Published by:

You add a new gem to your Gemfile and start using it in your application’s code. You never have to do ‘require <gemname>’ to use it in the application.

Ever wondered how rails autoloads all your gems? Let me walk you through the process which rails follow. Actually Rails uses Bundler to handle dependency management of all the gems and also autoload them.

How Rails put the gems “on the load path”?

[app]/config/boot.rb

The file is loaded during the rails initialization process and all it does is load rubygems and run Bundler. This will automatically discover your Gemfile and puts all the gems listed in the load path so that they can be required later. (Note: The gem’s aren’t run at this point, just the load paths are set.)

How are gems required (run) ?

[app]/config/application.rb

This file includes all the gems listed in the application’s Gemfile by calling Bundler.require. Bundler allows us to specify which groups to automatically require through the parameters to Bundler.require

The above code loads the assets group of gems only in development and test environments. It makes sense as we use precompiled assets in production, hence assets gems aren’t required to be loaded. (see Rails.groups). There are few comments in the file which will help you to change the default behavior if required.

Understanding rails initialization internals allows us to tweak the process to reduce the application load time. We’ll talk more about the process in the coming posts.

Development

What and Why of Rails?

Published by:

For the last few years, there is a lot of excitement going on about Rails among the web developers. Few months back, techies at Cybrilla have decided to give it a try and now Rails is the main development platform. I decided to blog the reasons behind it, so that it helps you to decide if you are planning to get your hands dirty with Rails.

What?

Rails is a web development framework based on Ruby Programming Language. It strictly follows MVC architecture and believes in ‘convention over configuration’ concept.

For developers with Java background: Rails is similar to struts / spring mvc etc.
For developers with PHP background: Rails is similar to CodeIgniter / Zend etc.
For developers with Python background: Rails is similar to django

Rails philosophy:
1. Convention Over Configuration – Every java developer has to face the problem of maintaining endless xml configuration files. Rails removes much of this pain by following certain conventions for file names, directory structures, database column names etc.
2. DRY: Don’t Repeat Yourself – Rails strongly believes that re-writing a same piece of code is a bad thing. Because so many implementation details are implied from a master source, making changes in Rails becomes straightforward and generally requires a change at a single location.
3. REST is the best pattern for web applications – Rails assumes that most of the web applications are/can-be organized around resources and therefore uses standard HTTP verbs extensively.

Why?

1. Conventions impose discipline in coding. This allows the developers to concentrate on the core application logic than on setting up the application, setting up the database, configuring database etc. mundane tasks.
2. Because of strong conventions, changes to applications are very cheap and therefore Rails is very strong in agile development space.
3. Great community of rails developers keep on building plugins which can be used for common tasks. This removes a lot of “plumbing” associated with building applications with other frameworks.

Above all, it’s fun developing in Rails, as everyday you get to see a new magic 😛

Bizkaro

The look and feel

Published by:

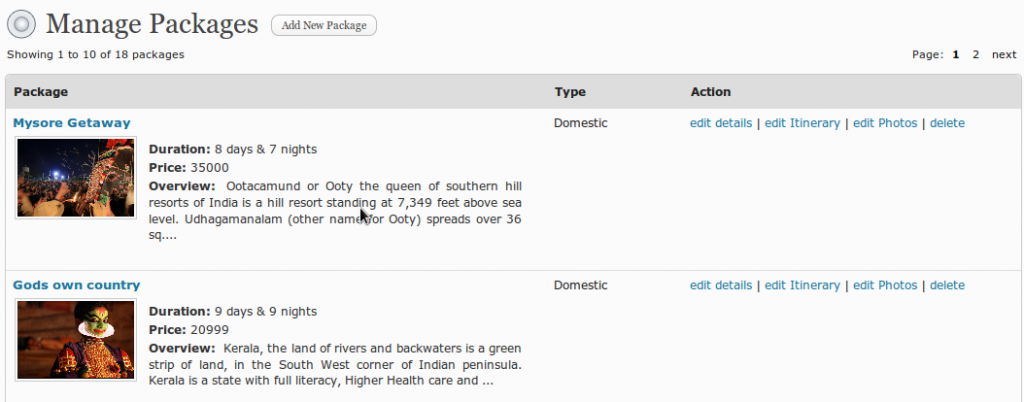
We have come up with a very intuitive dashboard for Bizkaro. The initial users of the product are very much impressed by the ease in using the dashboard. The dashboard is used to manage the content on the website.

I’ll give you a quick overview of the dashboard.

Bizkaro Dashboard MenuAll the available functionalities are nicely displayed on the left side of the screen. The functionalities are put into different categories for the ease of finding them quickly.

The right side of the screen is dedicated to display the actual content management forms. We have designed the flow (for adding new packages, adding new clients information etc.) very beautifully so that the user finds it very intuitive.

The header bar at the top displays the logged in user information and contains a link to go to the actual website.

We believe the users will find this UI interesting and easy to use. We look for your valuable feedback.